Goat kidding pens are small pens, sized for a single doe and her newborn kids. This small pen provides a private space for a doe to give birth and bond with her babies for a few days before returning to the larger herd. After shopping around for pre-built panels, we opted to draw up our own project plans and go the DIY route using welded wire cattle panels.
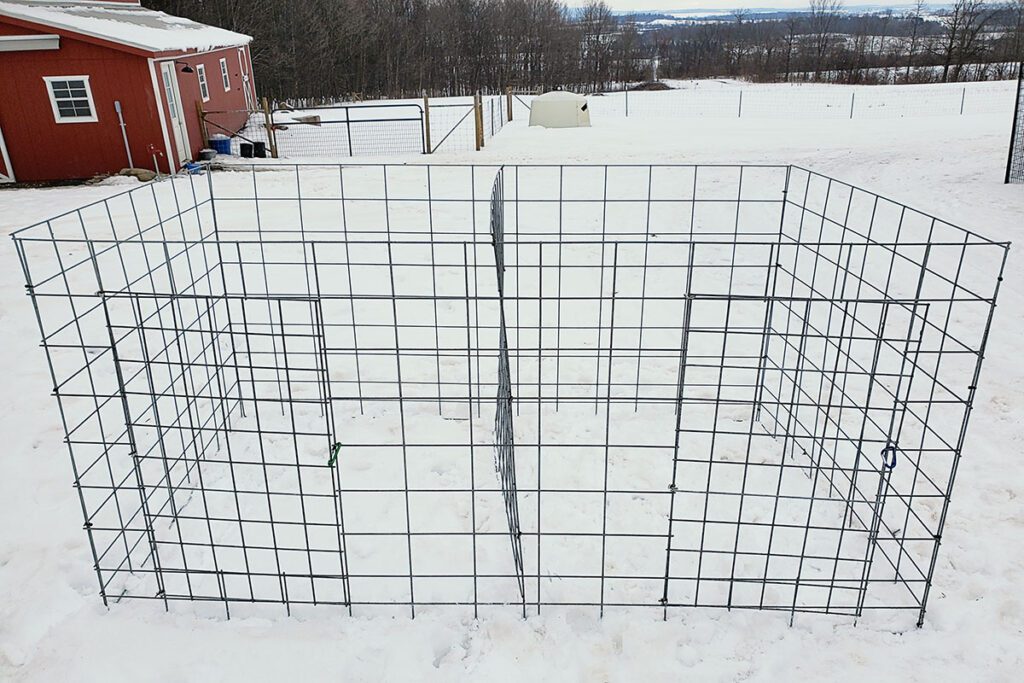
On our farm, goat kidding pens are a seasonal-use item. We only need them for a few weeks out of the year. They go into storage for the rest of the year, so we wanted to make set-up, take-down, and storage as simple as possible. We also wanted them to work within the existing pen system in our barn (read more about our flexible pen system here.) Our solution is these free-standing, pop-up kidding pens, that we built in a single afternoon!
Build You Own Kidding Pens
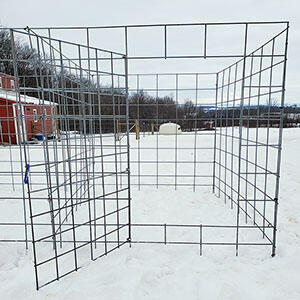
The plans we designed make two pens per set of panels. This lends structural strength to the free-standing design, without making them too large or heavy to handle by yourself or with one helper. The exact dimensions are dictated by the panels you use. For the most part, the pens can be customized to fit the space you are working with.
Our panel set gives us 2 pens 52″ wide by 64″ deep. The overall dimensions are 104″ x 64″. We used taller, 50″ panels to allow room for the gate holes. They fold flat for easy storage and pop up quickly when needed.
Now that we have built two sets of these pens, I can already see alternate uses for them! I imagine using them for turkeys, and pigs, or setting them up if we need to separate one or two goats. They come together quickly and are built with materials you can find at your local farm and ranch supply store. You can download a PDF copy of the plans here.
Materials list for 1 Panel Set (2 pens):
- (3) 16′ welded wire panels. We used cattle panels (they’re less expensive) but goat panels would also be a good choice.
- (24) Zip/Cable ties OR 1″ hog rings.
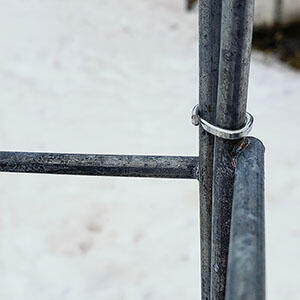
- (6) 1″ pipe clamps.
- (2) gate spring clips.
Tools needed for assembly:
- 25′ tape measure
- Bolt Cutters AND/OR Grinder with cutting wheel
- Hog ring pliers OR side cutter snips
Assembly Instructions:
Illustrations
Steps 1-8
- Determine your desired width for the set of 2 pens. Measure and cut 2 panels at that length.
- You will need to round your measurement up, or down to cut each panel at the nearest upright support. Be sure to leave the vertical support and cut the horizontal bars close to it so you can attach the front and back to the side panels.
- Determine your desired pen depth. Measure and cut 3 panels at that length. 2 for the sides, and 1 for the center divider.
- You will need to round your measurement up, or down to cut each panel at the nearest upright support. Be sure to leave the vertical support and cut the horizontal bars close to it so you can attach the sides and center to your front and back panels.
- On the front panel only, determine where you would like to cut holes for gates. Leave at least one row of squares on the top, bottom and sides of the hole for support. Cut out the INSIDE of the horizontal and vertical supports leaving a solid frame around the hole. The two gate holes should be evenly spaced leaving at least 3 squares in the center.
- You will have to duck going in and out of the pens, but without a top row, your pens will not hold their shape.
- From the extra panel, cut 2 gates. These should be the same size as your gate holes. Cut on the OUTSIDE of the horizontal and vertical supports leaving a solid frame around your gate.
- Attach the side panels to the front and back at the corners using hog rings or zip ties. Attach each corner in 4 locations. Make sure the horizontal supports of your panels are on the outside of the pens. This will help your pens fold easier.
- Attach the center divider. These connections should be in the center of a square. Do not fasten them tightly as the center divider needs to slide when you fold the pens up and down.
- Attach each gate to one side of the gate hole using hog rings or pipe clamps. Attach the top of the gate above the top edge of the hole.
- Place clips on the open side of the gates to hold them closed.
You’re panel set is done. Now you have two small pens that can be set up quickly and folded down for storage!
You May Also Like:
- From Barn to Bath – How Kinder Goats Led Us to Soapmaking
 It’s no secret that I love our Kinder goats. They were the first animals on our original homestead, and from the very beginning, they’ve brought us so much joy with their fun personalities, rich, creamy… Read more: From Barn to Bath – How Kinder Goats Led Us to Soapmaking
 - Learning As You Grow – It’s Okay to Start Small!
 When you’re working toward achieving big dreams, it is so tempting to wish you were starting at the end. You know, that place where the dream is fully realized and all the pieces are finished?… Read more: Learning As You Grow – It’s Okay to Start Small!
 - DIY Goat Kidding Pens
 Goat kidding pens are small pens, sized for a single doe and her newborn kids. This small pen provides a private space for a doe to give birth and bond with her babies for a… Read more: DIY Goat Kidding Pens